Real Estate Images Retouched by Professionals
Real estate photography requires skilled retouching to showcase properties effectively, emphasizing their best features and enhancing their appeal. High-quality images captured by simple cameras can be further improved through photo editing apps, increasing the likelihood of property sales. Mastering photo retouching is essential for real estate photographers, ensuring photos capture the property’s essence and appeal to potential buyers. Editing software like Adobe Photoshop and Lightroom enables retouchers to enhance details, resize images, adjust colors, and remove imperfections, enhancing the property’s marketing potential. Professional real estate photo editors streamline the editing process, offering services such as color correction, effect addition, window stain removal, and sky replacement to elevate property images. Becoming a real estate retouching editor requires education in photography and proficiency in tools like Adobe Photoshop, empowering editors to visualize and enhance real estate images effectively.
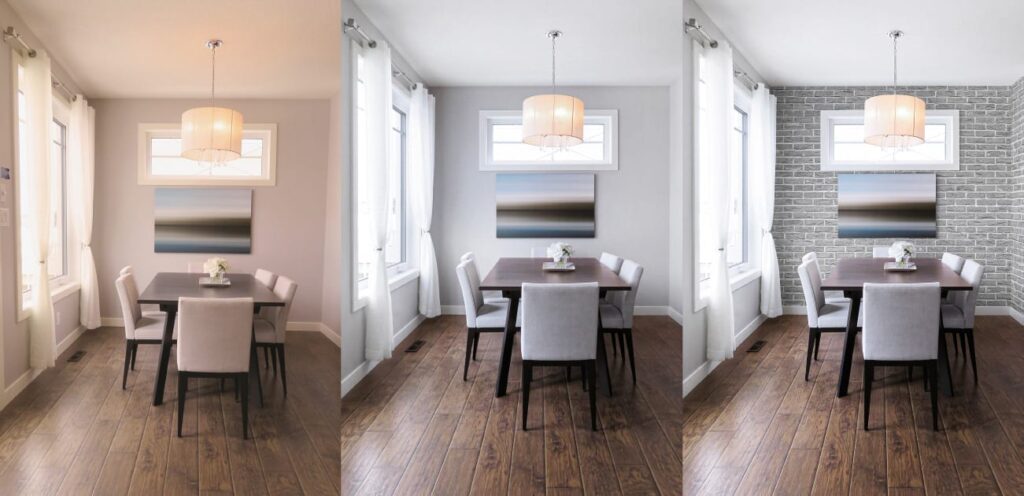
Our High-volume Real Estate Image Editing Services Work

Boost Your Real Estate Business with Professional Image Editing Real estate professionals juggle numerous challenges, especially amidst the ongoing pandemic. Enhancing visual appeal through real estate image editing services is key to attracting and retaining clients. Our high-volume editing services elevate ordinary photos to captivating ones, ensuring crispness, brightness, contrast adjustment, and grayscale enhancement. Stay ahead by swiftly updating property images to match your sales pace. We excel in transforming low-quality images into eye-catching visuals. With our high-volume capacity, we ensure your listings are always up-to-date with stunning property photos, delivering quick turnarounds and exceptional quality. Image editing solutions for real estate professional We utilize cutting-edge technologies and software tools to meet and surpass the needs of our real estate clients. Our comprehensive real estate photo editing solutions include: Brightness and contrast adjustment White balance adjustment Retaining window detail Lens correction Blending multiple exposures Curves and levels adjustments Perspective correction Background replacement Sky color adjustment Image resizing 360° panorama stitching services Grains and noise reduction Under and exposure adjustments Animated interiors and furniture Brightening shadowed highlights HDR picture enhancing Your Benefits: High-end German quality assurance at affordable Asian prices Efficient high-volume production with rapid turnarounds Expertise from Premedia/Prepress professionals from Germany, the USA, and India Highly skilled Asian image editing and photo retouching specialists Customer service available in English, German, and Thai
Remove white background in Photoshop 2021

Background removal services help beginner and professional photographers, online retailers, business owners, e-commerce, or fashion magazines in batch removing, replacing, and correcting the background. The services reviewed here claim to make your product look professional and suitable for sale or advertising. We sent the same photograph of the model showing the women’s tracksuit to 12 different popular background removal services. As a result, we selected 5 companies that have a nice price-quality ratio. Price, quality, following your requirements, responsiveness, and turnaround are the main aspects that we took into account. Removing a white background from an image can make it more versatile for use in various designs and marketing materials. Adobe Photoshop 2021 offers several efficient methods to achieve this. Here’s a step-by-step guide to help you remove a white background easily and effectively. Method 1: Using the Magic Wand Tool Open Your Image in Photoshop: Launch Adobe Photoshop and open the image from which you want to remove the white background by selecting File Open and choosing your file. Select the Magic Wand Tool: In the Tools panel on the left, select the Magic Wand Tool (shortcut: W). If it?s not visible, click and hold the Quick Selection Tool to reveal it. Adjust the Tolerance: At the top of the screen, set the Tolerance level. A lower value selects fewer colors similar to the one you click, while a higher value selects more. For white backgrounds, a tolerance of 20-30 usually works well. Select the Background: Click on the white background area. The Magic Wand Tool will select the white areas. Hold down the Shift key and click any additional white areas that weren?t initially selected. Invert the Selection: To select the subject instead of the background, go to Select Inverse or press Shift + Ctrl + I (Windows) / Shift + Command + I (Mac). Create a Mask: Click the Add Layer Mask button at the bottom of the Layers panel. This will create a mask that hides the white background. Method 2: Using the Select and Mask Workspace Open Your Image in Photoshop: Start by opening the image you want to edit in Photoshop. Select the Subject: Go to Select Subject. Photoshop will automatically select the main subject of the image. Refine the Selection: Click Select and Mask in the options bar. This opens the Select and Mask workspace. Use the Refine Edge Brush Tool to refine the edges of your selection, particularly around hair or fur. Choose Output Settings: In the Output Settings, choose Output to: Layer Mask and click OK. This will remove the white background and apply a mask to your subject. Method 3: Using the Background Eraser ToolOpen Your Image in Photoshop: Load the image from which you want to remove the background. Select the Background Eraser Tool: From the Tools panel, select the Background Eraser Tool (shortcut: E). If it?s not visible, click and hold the Eraser Tool to reveal it. Adjust the Settings: At the top of the screen, adjust the brush size, hardness, and spacing according to your needs. Set the Limits to Discontiguous and the Tolerance to around 25-50%. Erase the Background: Click and drag the Background Eraser Tool over the white background. It will erase the white areas while preserving the subject. Final Touches Check for Remaining Background: Zoom in and use the Eraser Tool to manually remove any remaining white pixels. Refine Edges: Use the Refine Edge tool in the Select and Mask workspace to smooth out rough edges. Save Your Image: Save your edited image by selecting File Save As and choosing a format that supports transparency, like PNG.